Changing Shoulder Abduction
Integrating assessment data to help athletes is vital to what we do at Driveline. One piece of data that we occasionally see is pitchers with high elbow climbs. Today, we’re discussing what we see from a training-floor perspective and a biomechanical assessment. This will be a good example of how you can combine biomechanics, assessments, and retesting with the knowledge of a throwing trainer in order to help make positive movement changes in your athletes.
Trainer Perspective of High Elbow Climb
At Driveline, pitchers throw our constraint drills nearly every single day. Each drill is designed for an athlete to focus on a particular part of the pitching motion. While the pivot pickoff is a key drill for remapping arm action, you can likely see high elbow climbs in nearly every drill.
Take, for example, this video taken from behind an athlete and consider how it gives us an idea of his arm action and, more specifically, where his elbow is in relation to his shoulders.
A ‘high elbow climb’ can be defined as the humerus (upper arm) getting too high going into ball release. Technically speaking, it is called a high shoulder abduction. Below is an example of how abduction is measured:
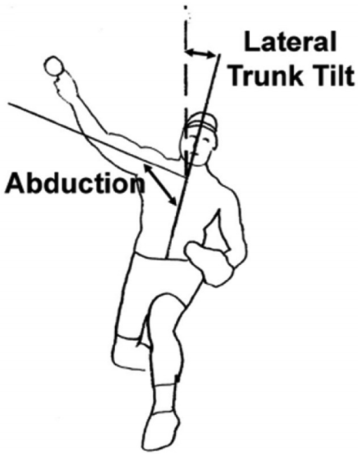
We’ve seen, on average, elite throwers are more consistent with their shoulder abduction from front-foot contact to ball release—almost as if their elbows and shoulders rotate on the same plane as one another.
Note where he’s throwing the ball in that first clip. This is really important–he throws directly in front of his face.
Now, we’ve seen that his arm action could use some adjusting, but there are some steps to take when approaching making a change like this.
- Explain the movement inefficiency. In this case, I showed him the path his elbow took in relation to his shoulders and told him to imagine them rotating on the same plane until release.
- Show the athlete what you (the coach) is seeing. I showed him where he was “aiming”–right in front of his face, almost across his body. The ball would land on the other side of his body indicating he was not throwing to someone in front of him but more to the glove-side. The fix was to aim in a direct line off his shoulder, and I had him set up and visualize the exact target on the wall (a piece of tape as a target can also help). Doing so made it much harder for him to exaggerate the elbow spiral and raise the elbow above his shoulders.
- Change the environment. Specifically for this athlete, a common fault was that he adjusted his lower half direction to compensate for where he was throwing the ball and his arm action reverted back. We set him up on a piece of tape and told him he could not land on the other side of it with his front foot.
Athletes working on the Plyo Ball ® wall can often get distracted by focusing internally on how they are moving instead of having an external focus. In this case, we like to try changing the environment (with tape in this case) to see if we can get better movement out of the athlete.
Biomechanics of High Elbow Climb
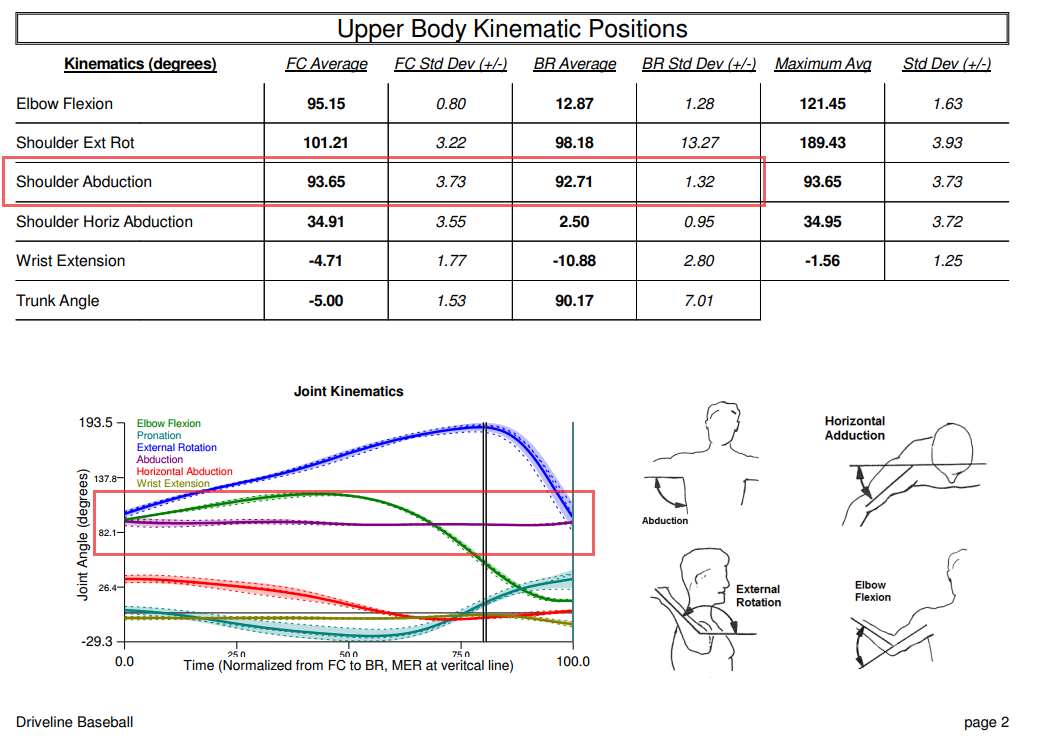
Within the biomechanics reports, we obtain various kinematic metrics of the upper and lower body during the throwing motion. In this case, we are going to look at upper torso positions like elbow flexion, external rotation, shoulder horizontal abduction, and shoulder abduction in reference to other segments as they move from foot contact through ball release. As mentioned above, for shoulder abduction we typically like to see consistency from foot contact through ball release at around 90 degrees.
What does this look like on the report? Below, we’ve clipped page two from our biomechanics report that outline the athlete’s upper-body kinematic positions. Shoulder abduction is highlighted in the table with the red box, and the path the angle follows from foot contact to ball release is the purple line on the graph, outlined by the red box. As you can see, the shoulder is right around 90 degrees at foot contact and ball release and generally follows a straight line along that 90-degree path.
We’ve touched on the importance of a consistent arm path. But biomechanically, it also makes sense that we would want to have consistent movement in this plane. During the arm action, the humerus will already have to move through the transverse plane (shoulder horizontal abduction), out of scap load, and into release.
Additionally, the fastest movement in sports will also be occurring at this joint through the internal rotation of the humerus, at speeds upwards of 6,000 deg/sec. With all that movement already occurring around those two axes, throwing in additional movement of the humerus at the level of the shoulder could possibly create inefficiencies and unwanted stress.
IMPORTANT NOTE: Not all arm paths are equal. Not everyone needs to subscribe to this idea of shoulder abduction being at 90 degrees from foot contact to ball release. This is a general observation, and ultimately everyone throws a little differently. It’s also possible that a certain thrower needs to have a different abduction path due to ROM deficiencies, impingements, anthropometric differences, etc. This idea of a shoulder-abduction path comes from the average of elite throwers that we see across the board. In this case, we’re using an athlete as an example of who would benefit from an adjustment because of his performance level and other information that was gathered in his assessment.
Changing Arm Action on the Plyo Ball ® Wall
Specifically for this athlete, he adjusted his lower-half direction to compensate for where he was throwing the ball. So, his arm action would not make the necessary adjustment. We then had to adjust his lower half to land directly ahead while still being able to hit the spot on the wall that we marked. We set him up with another piece of tape on the ground and told him he could not land on the other side of it with his front foot.
Let’s look at the second video, after the intervention

You can see the target adjustment made an improvement in how his arm unwinded. The elbow is much closer to the same plane as the shoulders.
While we saw immediate results, in that his arm action improved the way we wanted, this practice will need to be drilled often, daily if possible, to break the habit. It’s important that the athlete focuses on how it feels for him when he performs the drill correctly within the constraints, so he can reproduce it elsewhere without the constraints.
Lastly, it’s important to remember that this drill might not work forever and might not be right for everyone. As a trainer, you have to weigh the potential pitfalls of a drill and its adjustments with the potential improvements.
Biomechanics ReTests Can Help Us Tell if Changes Stick
Here’s a great example of an athlete that we have assessment and retest data on who needed to make a similar change. When he showed up, we deemed that his shoulder abduction path “had room to improve.”
Did ya see it? It’s right there. Here let’s try a different view, maybe that’ll help.

How about now? No? To be honest, neither did I, and I spend everyday looking at these images. But when we look at the data for the shoulder abduction path, It’s pretty clear that the path of the humerus is inefficient with room to improve. This is also a great example of the value of the biomechanics reports and their ability to provide us with objective data that we sometimes might miss.
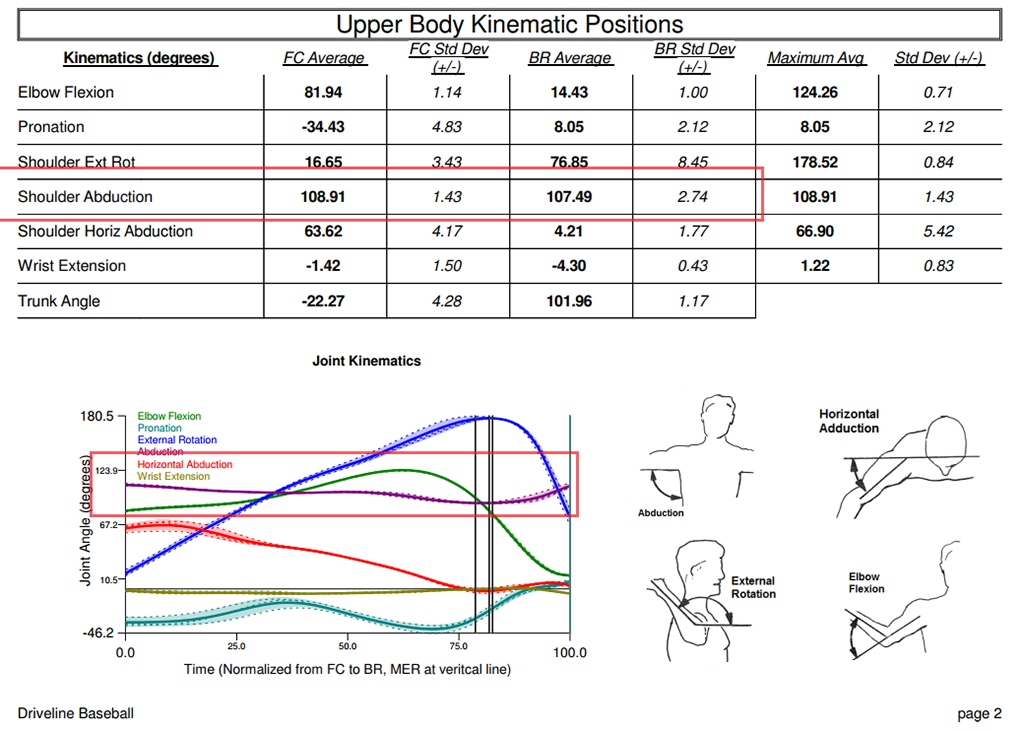
- The arm starts almost 19 degrees above 90 at foot contact.
- It drops down below 90 to about 87 degrees (as seen in the graph).
- It then comes back up to 107 degrees by ball release.
That’s quite a bit of unnecessary movement around an axis that we’d like to see stay more consistent.
This was noted in the athlete’s training profile:
“Shoulder abduction at ball release is pretty high, so really make sure to keep an eye on your arm path and make sure that your aren’t exaggerating the elbow spiral. Pivot Pickoffs are going to be the best drill to feel that.”
Data means nothing if we don’t monitor and then retest. So a few months later, following an emphasis on arm action and arm path, we retested this athlete in the biomechanics lab. It doesn’t look like much, but we made pretty significant changes.
Again, it’s hard to tell in the video, but the report is able to fill in the rest of the story for this athlete:
That’s pretty clean arm action. You can see the purple line of shoulder abduction stays fairly consistent at around 90 degrees from foot contact through ball release. Here’s another view where I’ve overlayed the assessment and retest data. The assessment data remains in color while the retest data is now black.
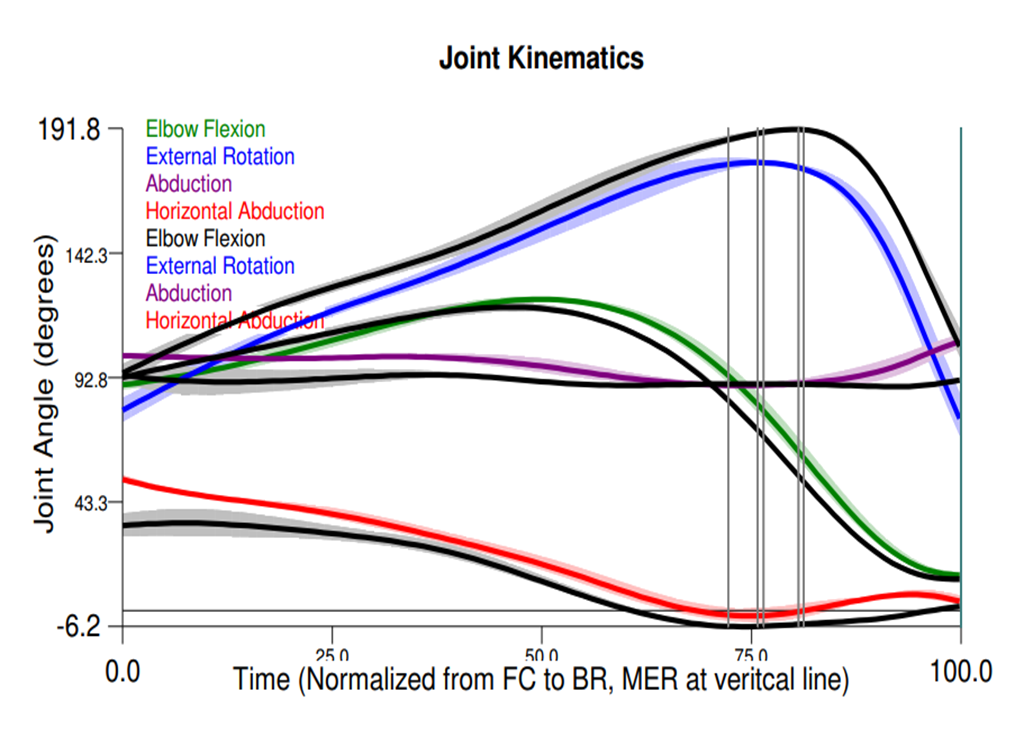
A few important things to note from this overlay:
- He has a significantly cleaner abduction path (purple).
- He is still able to maintain a good amount of shoulder horizontal abduction/scap load (red line).
- He achieves significantly more maximum external rotation (MER). It’s possible that this new abduction position allowed the athlete to achieve greater MER.
Additionally, this athlete gained 5 mph from his assessment mound velocity (84 mph) to his exit mound velo session (89 mph). While also maintaining a low max varus moment from assessment (74 Nm) to retest (80 Nm).
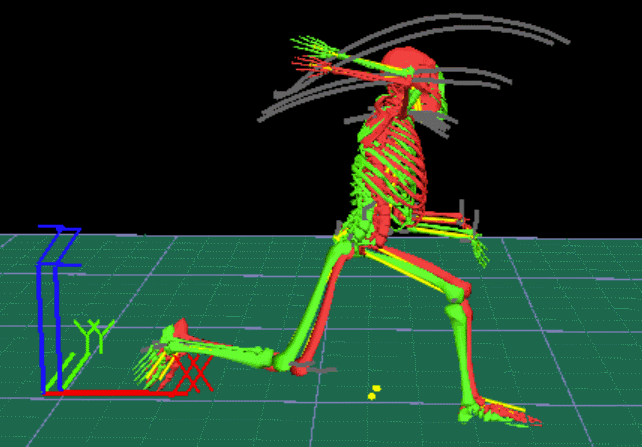
Let’s see what the overlay looks like when we compare the motion capture of both reports:
Red: assessment
Green: retest
Again, it’s hard to see much, but here’s what the data tells us:
- It doesn’t appear that the retest elbow is that much “lower,” which means that trunk positioning and tilt are heavily influencing shoulder abduction angle.
- For a split second in the middle there, you can see how the athlete has achieved great maximum external rotation, which could be related to this more efficient abduction path.
Conclusion:
- On average, elite throwers exhibit a consistent shoulder abduction from front foot contact through ball release (close to 90 degrees). Though, as we mentioned earlier, there are exceptions.
- As trainers, it is sometimes possible to see this in athletes on the Plyo Ball ® wall but having a motion capture report at Driveline goes a long way to validating our observations and the results of interventions.
- It is possible that constraint drills can help improve metrics like shoulder abduction. In addition to the drills, it can be useful to change the environment for desired movement changes. Also, it is important to clarify to the athlete what movement is desired, so they can aim to “feel” the change.
This blog post was co-written by Trainer Bryan Leslie and Biomechanicst Anthony Brady, was edited by Michael O’Connell
Comment section
Add a Comment
You must be logged in to post a comment.
Reggie -
Great Stuff would love to see this used on hitters.